

For changing directory / to /etc
[root@pc1 /]# cd /etc
One step back /etc to /
[root@pc1 etc]# cd ..
Go to previous working directory
[root@pc1 /]# cd -
Go to current login user home directory
[root@pc1 etc]# cd ~
Show the contents of /etc in single color
[root@pc1 ~]# dir /etc
Show the contents of /etc in different colors with nature of contents
[root@pc1 ~]# Ls /etc
create a folder on root partition
[root@pc1 ~]# mkdir /disk
Create a folder in /disk
[root@pc1 ~]# mkdir /disk/dir
Create multiple folder in multiple directories with single command
[root@pc1 ~]# mkdir /etc/dir1 /var/dir2 /usr/dir3
Create multiple folder in same directory
[root@pc1 ~]# mkdir dir1 dir2 dir3
Copy a file in directory
[root@pc1 disk]# cp file dir
Copy a file from /disk/file and paste it in /disk/dir/
[root@pc1 disk]# cp /disk/file /disk/dir
Copy a directory with –r option
[root@pc1 disk]# cp -r dir dir2
Copy a file from /disk/file and paste it in /etc with myfile name
[root@pc1 disk]# cp /disk/file /etc/myfile
Remove a file
[root@pc1 disk]# rm file
Remove a file with forcefully option
[root@pc1 disk]# rm –f file
Remove a directory with out –r option and you face will an error
[root@pc1 disk]# rm dir
Remove a directory with –r option
[root@pc1 disk]# rm -r /disk
Remove a directory with forcefully option
[root@pc1 disk]# rm -rf dir
Move /etc/dir1 to /disk/ with different name
[root@pc1 disk]# mv /etc/dir1 /disk/mydir
Rename the folder name mydir to dir
[root@pc1 disk]# mv /disk/mydir /disk/dir
Rename the file name with myfile
[root@pc1 disk]# mv file myfile
Read a file page by page with less command
[root@pc1 disk]# less /etc/grub.conf
Read a file page by page with more command
[root@pc1 disk]# more /etc/qrub.conf
Read first ten lines of grub.conf
[root@pc1 disk]# head /etc/grub.conf
Read last ten lings of grub.conf
[root@pc1 disk]# tail /etc/grub.conf
Read first 12 lines with –n option
[root@pc1 disk]# head -n 12 /etc/grub.conf
Read last 11 lines with –n option
[root@pc1 disk]# tail -n 11 /etc/grub.conf
Copy the contents of /etc/grub.conf in /disk/file
[root@pc1 disk]# cat /etc/grub.conf > /disk/file
Append the contents /etc/mtab in /etc/file
[root@pc1 disk]# cat /etc/mtab >> /disk/file
Merging tow commands with pipe sign output of the first command is input of second command
[root@pc1 disk]# cat /etc/squid/squid.conf I more
Count the total lines of squid.conf
[root@pc1 disk]# cat /etc/squid/squid.conf I wc -L
Show only spool words in squid.conf
[root@pc1 disk]# cat /etc/squid/squid.conf I grep spool
Flush the contents of file
[root@pc1 disk]# cat /dev/null > /var/log/messages
Showing posts with label Linux. Show all posts
Showing posts with label Linux. Show all posts
Linux Basic Commands
Saturday, July 31, 2010
Labels:
Linux
0
comments

How to install Monitorix in Ubuntu
Sunday, June 6, 2010
Monitorix is a free, open source, lightweight system monitoring tool designed to monitorize as many services as possible. At this time it monitors from the CPU load and temperatures to the users using the system. Network devices activity, network services demand and even the devices’ interrupt activity are also monitored, and more. The current status of any corporate server with Monitorix installed can be accessed via a web browser.
It has been designed to be used under production UNIX/Linux servers, but due its simplicity and small size you may also use it to monitor embedded devices.
Read more at Ubuntugeek.com
Labels:
Linux
0
comments
Trick: Enable high-speed USB 2.0 support in your VM
Saturday, August 8, 2009
If you have created your VM image using an earlier version of VMware Workstation or Server, you possibly see the following error messages or advice:
“"Please upgrade your virtual machine to enable high-speed USB 2.0 support for the device "Removable Disk". An attempt will be made to connect this device to the best available host controller. This may result in an undefined behavior for this device"
“"Please upgrade your virtual machine to enable high-speed USB 2.0 support for the device "Removable Disk". An attempt will be made to connect this device to the best available host controller. This may result in an undefined behavior for this device"
In some cases, you can’t upgrade your VM because the menu entry "Upgrade or Change Version" is grey and not changeable. In this case you have to open your vmx-file using your favorite editor and add the following line:
ehci.present = "true"
Save it and restart the VM. You are now able to use your USB 2.0 devices without problems.
Labels:
Linux
0
comments
Trick: ssh-xfer: Quickly grabbing files over an existing SSH connection
Monday, August 3, 2009
The Secure Shell (SSH) and Secure Copy (SCP) make remotely performing system administration and copying files across secure links a painless operation. SSH and SCP use the same SSH protocol to protect network communications, but they rely on users knowing if they want a shell or to copy a file beforehand. You cannot easily use an existing SSH shell connection to a remote machine and just grab one or two files; if you want the files, you'll have to make another SSH connection for the file copy using SCP -- unless you have ssh-xfer.
The ssh-xfer project uses the local SSH agent to allow you to easily grab files using an existing SSH shell connection. You do not have to modify either the SSH client or server programs to use ssh-xfer -- but you will need to patch your ssh-agent. Although having to patch the ssh-agent is not ideal, you do gain one major advantage by doing this: you can send a file through more than one SSH connection.
Labels:
Linux
0
comments
Tip: Fedora 11's best five features
Tuesday, March 3, 2009
Fedora, Red Hat's community Linux's arrival has been delayed until early next week, June 2, but the release candidate is already looking mighty darn good. I've been using Fedora 11 since the late beta showed up in mid-April, and I've been very impressed. It's fast, it's stable, and it's got a snazzy new look. That said, there's one change that I'm not crazy about, audio control, so let's get that out of the way first.
In Fedora 11, or more properly its main desktop interface, GNOME 2.26, uses a new and mindlessly simple audio control: the PulseAudio volume control widget. Instead of multiple sliders that give you direct control over the low-level ALSA (Advanced Linux Sound Architecture) system, you get one slider for volume. That's it.
Labels:
Linux
0
comments
How to install FreeNX on Suse 10.0?
Sunday, August 3, 2008
NoMachine NX is a Terminal Server and remote access solution based on a comprising set of enterprise class open source technologies. NX makes it possible to run any graphical application on any operating system across any network connection at incredible speed.
FreeNX application/thin-client server is based on NoMachine’s NX technology. It can operate remote X11 sessions over 56k modem dialup links or anything better. FreeNX package contains a free (GPL) implementation of the nxserver component. The following workshop describes the FreeNX installation on a Linux Suse 10.0 server.
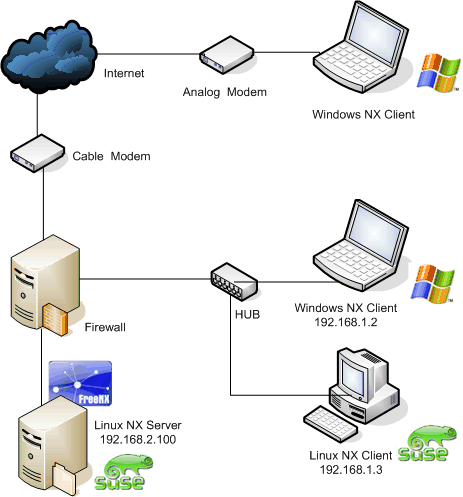
In the workshop setup the NX server is running behind a firewall. You can access it from outside your environment (i.e. the Internet) via an analog or ISDN MODEM or from inside you LAN.
NOTE: Please make sure to configure your firewall correctly to allow SSH connections (Port 22) from both sides. In the workshop setup the NX server is running behind a firewall. You can access it from outside your environment (i.e. the Internet) via an analog or ISDN MODEM or from inside you LAN.
You also need to allow inbound traffic TCP to port 5000.
The workshop setup could look like this:
Labels:
Linux
0
comments
Backup and Restore MBR
Tuesday, June 3, 2008
Backing up Master Boot Record (MBR)
The MBR is a 512 byte segment on the very first sector of your hard drive composed of three parts: 1) the boot code which is 446 bytes long, 2) the partiton table which is 64 btyes long, and 3) the boot code signature which is 2 bytes long. The core of the backup command is dd—which will be familiar to every system administrator, especially to those who intend to clone an entire hard disk. To see all the options type man dd. As we want to back up only the first 512 bytes we need to append some arguments to it. Here is the full command you need (and remember to run it as the root user, su (and sudo for Ubuntu users):
The MBR is a 512 byte segment on the very first sector of your hard drive composed of three parts: 1) the boot code which is 446 bytes long, 2) the partiton table which is 64 btyes long, and 3) the boot code signature which is 2 bytes long. The core of the backup command is dd—which will be familiar to every system administrator, especially to those who intend to clone an entire hard disk. To see all the options type man dd. As we want to back up only the first 512 bytes we need to append some arguments to it. Here is the full command you need (and remember to run it as the root user, su (and sudo for Ubuntu users):
dd if=/dev/hda of=/home/richmondg/mbr_backup bs=512 count=1
Restoring the MBR
You can use a live CD to access your hard drive and read the backup off any removable media such as a USB stick. Here is the command:
dd if=/dev/sda/mbr_backup of=/dev/hda bs=512 count=1
Again, amend sda to read where you saved the MBR and run the command as root. If you wish to kill the MBR altogether, including the partition table, then you can overwrite it with a series of zeros:
dd if=/dev/zero of=/dev/hda bs=512 count=1
If you want to kill the MBR but leave the partition table intact then simply change 512 to 446.
Another way to repair the mbr of your HDD device is install LILO then type (replacing x with the letter of your HDDdevice) :
lilo -M /dev/sdx
Labels:
Linux
0
comments
Trick: The Perfect Server - Fedora 9
Sunday, February 3, 2008
This is a detailed description about how to set up a Fedora 9 server that offers all services needed by ISPs and hosters: Apache web server (SSL-capable) with PHP5 and Ruby, Postfix mail server with SMTP-AUTH and TLS, BIND DNS server, Proftpd FTP server, MySQL server, Dovecot POP3/IMAP, Quota, Firewall, etc. This tutorial is written for the 32-bit version of Fedora 9, but should apply to the 64-bit version with very little modifications as well.
I will use the following software:
- Web Server: Apache 2.2.8
- PHP 5.2.5
- Ruby
- Database Server: MySQL 5.0.51
- Mail Server: Postfix
- DNS Server: BIND9 (chrooted)
- FTP Server: proftpd
- POP3/IMAP server: Dovecot
- Webalizer for web site statistics
In the end you should have a system that works reliably, and if you like you can install the free webhosting control panel ISPConfig (i.e., ISPConfig runs on it out of the box).
Read more at Howtoforge.com
Labels:
Linux
0
comments
Battle of the Elite: openSUSE vs. Mandriva
Tuesday, January 1, 2008
Mandriva and openSUSE are two well-established Linux distributions worthy to be considered elite. Both have successfully conquered the hearts of many Linux enthusiasts long before Ubuntu and PCLinuxOS took the stage. With their latest releases namely Mandriva Linux 2008 and openSUSE 10.3, they remained a force to be reckoned with.
Conclusion:
Mandriva Linux 2008 may have convincingly won the battle against openSUSE 10.3 but not unanimously because there’s only one judge and that is me :) So, to those who have experienced using these two distros and can compare which of them is better, feel free to give us some feedback.
Mandriva Linux 2008 may have convincingly won the battle against openSUSE 10.3 but not unanimously because there’s only one judge and that is me :) So, to those who have experienced using these two distros and can compare which of them is better, feel free to give us some feedback.
Read more at TechSource
Labels:
Linux
0
comments
Testing Web application security using Google's ratproxy
To help developers audit Web application security, Google has released an open source tool called ratproxy. It is a non-disruptive tool designed for Web 2.0 and AJAX applications that produces an easy-to-read report of potential exploits.
Ratproxy is a local program designed to sit between your Web browser and the application you want to test. It logs outgoing requests and responses from the application, and can generate its own modified transactions to determine how an application responds to common attacks.
The list of low-level tests it runs is extensive, and includes:
- potentially unsafe JSON-like responses
- bad caching headers on sensitive content
- suspicious cross-domain trust relationships
- queries with insufficient XSRF defenses
- suspected or confirmed XSS and data injection vectors
Read more at Linux.com
Labels:
Linux
0
comments
Subscribe to:
Posts (Atom)

